comments edit

When it comes to calling the Azure ARM API, the standard approach is to reference the relevant NuGet packages to get the right client API. I have a complete example of doing this here. Specifically, that sample is using Microsoft.Azure.Management.WebSites.

There is nothing wrong with this approach, which gives you a high level API experience with intellisense.

But I don’t want to use a library!

On the other hand, some developers with knowledge of the API prefer to be close to the wire and call the REST API directly, without using specific libraries. And doing this with the Azure API is actually pretty easy, once you get passed the authentication part.

I posted a full sample on GitHub, so you may want to start by looking at that. The sample assumes that you have already set up a Service Principal to access your Azure subscription.

The first step is to obtain an authentication token for your Service Principal. The sample includes a helper function to do this, that you can copy in your code. I won’t go into the details of the helper (which is really just a REST call), but calling it is straightforward:

string token = await AuthenticationHelpers.AcquireTokenBySPN(
	tenantId, clientId, clientSecret);

Once you have the token, you’re ready to create your HttpClient:

using (var client = new HttpClient())
{
    client.DefaultRequestHeaders.Add("Authorization", "Bearer " + token);
    client.BaseAddress = new Uri("https://management.azure.com/");

    // Now you can party with your HttpClient!
}

All it’s doing is set the Authorization header with the token, and set the base URL so we don’t have to specify it on every request.

Now that we have an HttpClient, we’re ready to call the Azure ARM API directly. e.g. creating a resource group will look like this:

using (var response = await client.PutAsJsonAsync(
    $"/subscriptions/{Subscription}/resourceGroups/MyResourceGroup?api-version=2015-11-01",
    new
    {
        location = Location
    }))
{
    response.EnsureSuccessStatusCode();
}

And creating an App Service Plan within that resource group looks like this:

using (var response = await client.PutAsJsonAsync(
    $"/subscriptions/{Subscription}/resourceGroups/MyResourceGroup/providers/Microsoft.Web/serverfarms/MyFreePlan?api-version=2015-08-01",
    new
    {
        location = Location,
        Sku = new
        {
            Name = "F1"
        }
    }))
{
    response.EnsureSuccessStatusCode();
}

Stopping a Web App is an action, so it requires a POST instead of a PUT:

using (var response = await client.PostAsync(
    $"/subscriptions/{Subscription}/resourceGroups/MyResourceGroup/providers/Microsoft.Web/sites/MyApp/stop?api-version=2015-08-01",
    null))
{
    response.EnsureSuccessStatusCode();
}

And deleting a Web App is of course a DELETE:

using (var response = await client.DeleteAsync(
    $"/subscriptions/{Subscription}/resourceGroups/{ResourceGroup}/providers/Microsoft.Web/sites/{WebApp}?api-version=2015-08-01"))
{
    response.EnsureSuccessStatusCode();
}

I have a few more examples in the sample app, so check it out. Note that even though I’m focusing on Azure App Service (where I work), you can use this approach to call any ARM APIs: Virtual Machines, Storage, etc…

What if you don’t know the API?

The simplest way to learn the API in an interactive way is to use Azure Resource Explorer (https://resources.azure.com/).

Using this, you could have come up with all the samples above without any prior knownledge of the API. In fact, you can even ‘practice’ making the calls in Resource Explorer before making the REST calls in C#. Since C#’s anonymous object syntax is very JSON like, it’s simple to translate from one to the other.

What about other languages?

That’s another benefit of the straight REST approach. Since we’re not relying on any libraries, it doesn’t really matter what language you use. As long as you know how to make http requests, you’re set!

comments edit

Update 9/3/2015: there is now a simpler way to associate a schedule with a WebJob. Please see this post for details.

Creating an Azure WebJob that runs on a schedule is a topic that can be a bit confusing. The most important thing to understand about it is that it involves two very separate components:

  1. You have a triggered WebJob published to a Web App. This WebJob exposes a private endpoint that allows is to get triggered. The WebJob knows nothing about who is doing the firing, and whether a scheduler is involved.
  2. Separately, you have an Azure Scheduler job that is set up to trigger the WebJob on some schedule.

Those two things end up working together, but they don’t really know anything about each other. The only link between them is that the Scheduler Job happens to be pointing at the WebJob’s endpoint.

While there are some workflows in the current portal (https://manage.windowsazure.com/) and in Visual Studio that can make the hookup easier, they don’t cover all scenarios. Also, it is good to understand how things work under the cover, and this post explains it by showing the ‘manual’ steps.

Assumption: you already have a triggered WebJob

The assumption in this post is that you already know how to publish a WebJob to an Azure WebApp (without any schedule). This can be done in a number of ways (e.g. zip file upload in the portal, WebDeploy from VS, git deployments), and I will not cover those topics here.

This post starts at the point where you have deployed a triggered WebJob, and you’re looking to attach a scheduler job to it so it gets triggered on some schedule.

If you look in the WebJobs tab for your host Web App, you’ll see something like this:

image

Getting the publish profile for the Web App that hosts the job

To download it, just Go to the dashboard of your WebApp in the portal, and click ‘Download the publish profile’.

image

You can do the same thing in the Preview Portal (https://portal.azure.com/), which can be necessary if using an API App (which doesn’t show up in the regular portal):

image

In that file, you will find the credentials (they are unique per site), which you will use later in this post. They’ll look like this (no these are not real!):

userName="$DavidWebJobTestApp"
userPWD="WauLFsqoLggpXfjT2z9Hq27kXS6luqn6F3ncRa9bjQjPssCBqB5jKu2Zk4Ed"

Creating a scheduler job

Find the scheduler node in the left bar in the portal:

image

If you don’t have any scheduler jobs, it’ll look like this:

image

Click the link to create one, which opens the bottom pane under App Services / Scheduler / Custom Create.

A scheduler job belongs to a Job Collection. So if you don’t yet have a collection, you’ll need to create one. Or if you already have one, you can add a new job to it. Here we’ll create a new one, in the same region as the site (not required, but preferable):

image

Now, there is a somewhat complex step, as you need to assemble the trigger URI to your WebJob. It looks like this:

https://{userName}:{password}@{WebAppName}.scm.azurewebsites.net/api/triggeredwebjobs/{WebJobName}/run

Let’s look at the tokens you need to replace:

  • The username and password are from the Publish Profile above
  • WebAppName is the WebApp that hosts your WebJob. e.g. davidwebjobtestapp
  • WebJobName is the name you gave to your WebJob (not to be confused with the name you give to your scheduler job!). e.g. triggeredwebjobs

Putting it all together, you get a full URL that looks like this:

https://$DavidWebJobTestApp:WauLFsqoLggpXfjT2z9Hq27kXS6luqn6F3ncRa9bjQjPssCBqB5jKu2Zk4Ed@davidwebjobtestapp.scm.azurewebsites.net/api/triggeredwebjobs/MyWebJob/run

You can now fill in the next step of the wizard:

  • Give some name to your scheduler job. It doesn’t have to match the WebJob’s name, but it might be a good idea so you remember what it points to (here I gave them different names).
  • Action type should be https.
  • Method should be POST.
  • URI is what we cooked up above.
  • Leave the body blank.

image

On the next step, we’ll set up the schedule. e.g. let’s make it fire every hour for the next month:

image

And that’s it, the scheduler job is set up!

Note: by default, the job collection is created in Standard mode. But if you like you can switch it to Free mode. There are a number of limitations in Free mode, but it is good enough if you are just learning about the feature.

To switch it to Free, go to the Scale tab for the Job Collection:

image

Monitoring your WebJobs

You can do two types of monitoring:

  • Scheduler level: you can ask the scheduler for a history of what it has fired. This is the ‘client view’.
  • WebJobs level: you can ask the WebJobs for what it has received. This is the ‘server view’.

For the scheduler view, just go to the history tab in your scheduler job collection:

image

For the WebJobs view, click on the Logs link, which you can see in the first image in this blog post. This takes you to the WebJobs dashboard, e.g.

image

If you feel like your WebJobs are not running, you may need to check both places. For instance, if the password you entered is incorrect, the scheduler would tell you it got an authentication error, while the WebJobs dashboard won’t have received anything at all.

Cleaning up WebJobs and Scheduler Jobs

Note that if you delete a WebJob (or the Web App that hosts it), the scheduler job pointing to it will keep firing, and getting back errors since there is no one listening. So you probably want to delete the scheduler jobs as well.

Or if you don’t have any scheduler jobs left, just delete the whole job collection, to make sure that you don’t incur charges related to it.

comments edit

ARMClient is a console application that makes it easy to send HTTP requests to the new Azure Resource Manager REST API. Note that it only supports the new Azure API (ARM) and not the older one (RDFE).

A few notes before we start

At this point, ARMClient is not an official Microsoft tool. It is an OSS Project written primarily by suwatch. You can find it on https://github.com/projectkudu/ARMClient. We are releasing it because we think it can be useful to others. Based on the feedback, we’ll see what direction we will take with it.

Also, note that this post is primarily about the ARMClient tool, and is not meant to be a general tutorial for the ARM API. You can check out the REST API Reference to learn about some of the concepts. You can also find lots of examples on the ARMClient wiki.

If you get stuck figuring out how to do something with ARMClient, feel free to discuss in an ARMClient GitHub issue.

Why this tool

Today, there are two primary ways of automating the Azure API from the command line:

Both of these options offer a fairly high level of abstraction over the Azure API. e.g. to create a site with xplat-cli, you would run something like azure site create mywebsite.

By contrast, ARMClient makes no effort to abstract anything, and instead lets you use the raw API directly. The closest thing you should compare it to is good old cURL. And while you could use plain cURL to do the same, ARMClient makes it a lot easier, both because it helps with authentication and because its syntax is simpler/cleaner.

There are pros and cons to each approach. One big benefit of the ARMClient approach is that you can call any supported ARM API. With PowerShell/xplat-cli, there can be delays before new APIs get abstracted into new commands (of course, ideally that wouldn’t be the case, but as things stand, it does happen).

On the downside, some will find that the ARMClient approach is too low level, and that they don’t want to work at the raw HTTP/JSON level. Though I will say that it is not as scary as it may sound at first :)

Getting ARMClient

ARMClient is distributed via Chocolatey. After installing Chocolatey (if you don’t already have it, you’ve been missing out!), just run:

choco install armclient

And you’ll magically have ARMClient.exe on your path. Run it without parameters to get the help text.

Authenticating with Azure

There are two main ways you can do this.

The first is by logging in interactively using your Microsoft Account (or your Work/School account). You don’t need to run any special commands to do this. Instead, the first time you make a regular ARMClient request, it will pop up a browser window and prompt you for credentials. This is probably where you want to start to play around with this tool.

The second is to use a Service Principal. My earlier post explains what it is, and how to create one. This is what you would use in automated scenarios, like in a CI server.

To take the example from that post, after setting things up, you end up with something like this (no, they’re not valid credentials!):

  • Tenant ID: 361fae6d-4e30-4f72-8bc9-3eae70130332
  • AppId/Username: dc5216de-6fac-451a-bec4-9d2fb5568031
  • Password: HGgDB56VAww1kct2tQwRjOWBSkUOJ3iMDGEiEjpBZEQ=

You use these three pieces to authenticate as follows (‘spn’ stands for Service Principal Name):

armclient spn 361fae6d-4e30-4f72-8bc9-3eae70130332 dc5216de-6fac-451a-bec4-9d2fb5568031 HGgDB56VAww1kct2tQwRjOWBSkUOJ3iMDGEiEjpBZEQ=

Note that whichever authentication method you use, armclient caches the resulting token in your %USERPROFILE%\.arm folder (in encrypted form). If you want to clear the cache, you can just run armclient clearcache.

Making requests

Now that we’re authenticated, it’s time to make requests!

Let’s start with something simple and list our subscriptions:

armclient GET /subscriptions?api-version=2014-04-01

Which returns something like this (you may have multiple):

{
  "value": [
    {
      "id": "/subscriptions/9033bcf4-c3c2-4f82-9e98-1cc531f1a8a8",
      "subscriptionId": "9033bcf4-c3c2-4f82-9e98-1cc531f1a8a8",
      "displayName": "MSDN",
      "state": "Enabled"
    }
  ]
}

Note how the API version in passed on the query string. This is true of all calls to the ARM API.

Since most requests are made on a subscription, lets make our life easier and set up a variable for the root of the path that captures the subscription:

set SUB=/subscriptions/9033bcf4-c3c2-4f82-9e98-1cc531f1a8a8

Now let’s list the resource groups in our subscription:

armclient GET %SUB%/resourceGroups?api-version=2014-04-01

This will return something like this:

{
  "value": [
    {
      "id": "/subscriptions/9033bcf4-c3c2-4f82-9e98-1cc531f1a8a8/resourceGroups/MyResGroup",
      "name": "MyResGroup",
      "location": "northeurope",
      "properties": {
        "provisioningState": "Succeeded"
      }
    },
	  // various other resource groups
  ]
}

Now let’s list all Websites in this resource group:

armclient GET %SUB%/resourceGroups/MyResGroup/providers/Microsoft.Web/sites?api-version=2014-11-01

To create a new Website, we’ll need to do a PUT. Note that PUT requests are used both for creation and update operations.

The minimal body we need to pass in looks like this:

{
  "location": "North Europe",
  "properties": { }
}

Put that in a CreateSite.json file and run:

armclient PUT %SUB%/resourceGroups/MyResGroup/providers/Microsoft.Web/sites/MyCoolSite%?api-version=2014-11-01 @CreateSite.json

Note how @CreateSite.json (with the @ sign) means it’s coming from a file. You could also place the content inline if it’s small, e.g.

armclient PUT %SUB%/resourceGroups/MyResGroup/providers/Microsoft.Web/sites/MyCoolSite?api-version=2014-11-01 "{location: 'North Europe', properties: {}}"

Notice how it returns a response containing the state of the new site object (e.g. its host names and many other things).

Now let’s change the site’s PHP version to 5.6. We’ll use this body:

{
  "properties": {
    "phpVersion": "5.6"
  }
}

And then make this request:

armclient PUT %SUB%/resourceGroups/MyResGroup/providers/Microsoft.Web/sites/MyCoolSite/config/web?api-version=2014-11-01 @RequestBodies\SetPHPVer.json

Note that phpVersion is a site config property, and not a site level property, hence the extra config/web at the end of the path.

Now, here is how you would stop and start the site:

armclient POST %SUB%/resourceGroups/MyResGroup/providers/Microsoft.Web/sites/MyCoolSite/stop?api-version=2014-11-01
armclient POST %SUB%/resourceGroups/MyResGroup/providers/Microsoft.Web/sites/MyCoolSite/start?api-version=2014-11-01

Finally, let’s delete this site:

armclient DELETE %SUB%/resourceGroups/MyResGroup/providers/Microsoft.Web/sites/MyCoolSite?api-version=2014-11-01

Using ARMClient in PowerShell scripts

Now let’s see how we can make use of ARMClient in a PowerShell script. Let’s use it to add an App Setting to a site.

One tricky thing about App Settings is that you need to roundtrip the whole collection if you want to add one. This gives us an interesting challenge, as we need to GET them, modify them and then PUT them back.

Here is how we can do it:

$sitePath = "/subscriptions/9033bcf4-c3c2-4f82-9e98-1cc531f1a8a8/resourceGroups/MyResGroup/providers/Microsoft.Web/sites/MyCoolSite"
$res = ([string] (armclient POST "$sitePath/config/appsettings/list?api-version=2014-11-01")) | ConvertFrom-Json
$res.properties | Add-Member -Force "foo" "From PowerShell!"
$res | ConvertTo-Json | armclient PUT "$sitePath/config/appsettings?api-version=2014-11-01"

So here is what happens:

  • We first get the App Settings. Note that this is done via a POST to the list verb instead of a GET, because it involves secrets that a plain reader should not see. This is a pattern that you will see in various places in the ARM API.
  • We then convert the JSON output into a PowerShell object
  • Now we use Add-Member to add an App Setting in to the res.properties object
  • We then convert the PowerShell object back to JSON and pipe it into ARMClient to do the PUT. Note that ARMClient supports getting input from stdin (instead of being on the command line) for this kind of piping scenarios.

Give us feedback!

Please let us know what you think about this tool. You can post comments here, or open issues on https://github.com/projectkudu/ARMClient. And feel free to send a pull request if you want to get a change in.

comments edit

Update 10/19/2015: you should also check out this post for new PowerShell commands that were not available at the time I wrote the post below.

See also this video from Jeffrey Teehan that shows how do make everything work using a combination of the old and new portals

Scenario: you have a CI machine where you need to automate the Azure API. It only needs access to a specific set of resources, and you don’t want it to be able to do more than that.

Solution: you can create a Service Principal account and give it just the set of permissions that it needs. This is a far better solution than using a Management Certificate, which has full power over a subscription.

I’ll also give a disclaimer here: I work on the Azure Websites team, and not on the Identity team. I’m not an expert on that topic, but what I describe below is a technique that should work well.

A tale of two APIs

Azure supports two different REST APIs:

  • the old one, known as RDFE
  • the new one, known as ARM (Azure Resource Manager)

Many people are still using RDFE, as it’s been the only API for years. But ARM is what the cool kids are doing now, and it is worth taking the time to switch over. Besides being a nicer REST API, it supports new key concept like Resource Groups, Deployment Templates and RBAC (Role Based Access Control).

The reason I’m mentioning this is that the technique described here is exclusively for ARM.

A few notes before we start

I have to warn you that the steps to initially create a Service Principal are fairly complex, kind of ugly, and in some cases rather illogical. I do know that this will get easier in the future, but for now it’s a bit of necessary pain to get this going.

The good news is that after those one-time steps, the workflow gets pretty reasonable, and is quite powerful.

Another area to discuss is the two types of Azure accounts:

  • Microsoft account (aka Live ID or Passport ID if you’re an old-timer)
  • Work or School account (aka Org ID)

The steps below can work with both, but since most people today use a Microsoft account, that’s what I’m using in the examples.

Creating an AAD application

The first thing you’ll need to do is create an AAD application. To do this, go to the Current Azure portal (https://manage.windowsazure.com/) and choose Active Directory in the left pane.

image

As a Microsoft Account user, you should have an active directory named after you:

image

Click on its name, and then click on APPLICATIONS. It’ll probably say that you don’t have any. Click to add one:

image

In the next dialog, choose Add an application that my organization is developing:

image

Now you’ll need to give an answer that probably won’t make more sense. Our goal is to automate Azure from our client, yet here you have to tell it to create a Web app. Just go along with it. I warned you some steps would not be too logical!

image

Now it’s asking you for two URLs. In our scenario, using URLs here doesn’t really make sense (it does for other scenario). But you’ll want to enter some recognizable URL, as we’ll need it later during role assignment. e.g. I use http://DavidsAADApp, which is bogus as a URL, but is recognizable to represent my app (this will get cleaner in the future).

image

Congratulations, you now have an AAD application! In there, click on the CONFIGURE tab:

image

First, find the Client ID and save it. This will basically be your username:

image

Now go to the Keys section, click on the drop down, and pick 1 or 2 years:

image

After you hit save at the bottom, it will display your key, which is basically your Service Principal account password. Save it and store it in a secure place (like a password manager). You will never see it again in the portal!

image

One last thing you need to do is get your tenant ID. The way to do this is a bit harder than it should be (I know, I know…). Click on the View Endpoints button in the bottom bar:

image

It will show you a bazillion URLs. Click copy on the first one (any of them will do). I will look like this:

https://login.windows.net/361fae6d-4e30-4f72-8bc9-3eae70130332/federationmetadata/2007-06/federationmetadata.xml

The GUID in there is your tenant ID, which you’ll need later.

It was complex to get here but the summary is that you now have a Service Principal account with a username and a password. And we also have our tenant ID:

  • Username: dc5216de-6fac-451a-bec4-9d2fb5568031
  • Password: HGgDB56VAww1kct2tQwRjOWBSkUOJ3iMDGEiEjpBZEQ=
  • Tenant ID: 361fae6d-4e30-4f72-8bc9-3eae70130332

Now let’s move on…

Assigning roles to your Service Principal

You have a Service Principal account, but right now it’s not allowed to do anything. You’ll need to use Azure PowerShell to do this (until the Preview Portal adds support for it).

Here, you’ll want to log in as your Microsoft identity in order to grant roles to your Service Principal identity (conceptually: you’re the boss, and you set permissions for your ‘employee’).

Login-AzureRmAccount # This will pop up a login dialog

Now, you can assign roles to your Service Principal. e.g. let’s give it access to one of the resource groups in our subscription. You can use either App ID Uri or Client ID as the value for the -ServicePrincipalName parameter.

New-AzureRmRoleAssignment -ServicePrincipalName http://DavidsAADApp -RoleDefinitionName Contributor -Scope /subscriptions/9033bcf4-c3c2-4f82-9e98-1cc531f1a8a8/resourceGroups/MyResGroup

Or if you want it to have access to the whole subscription, just leave out the Scope:

Select-AzureRmSubscription -SubscriptionId <subscription-id>
New-AzureRmRoleAssignment -ServicePrincipalName http://DavidsAADApp -RoleDefinitionName Contributor

If you run Get-AzureRmRoleAssignment, you should see the assignment.

Using your Service Principal account

So we’ve finally come to the point where you can make use of this!

We’re going to use PowerShell again, but this time not as ourselves, but as the Service Principal identity. e.g. this is what you would do on your CI server, where you’d never want it to use your own identity.

To make sure that we’re not cheating, let’s start by removing all identities that PowerShell knows about. You can list them using Get-AzureAccount, and then run Remove-AzureAccount YourLiveID@live.com to remove it.

Now, let’s get our Service Principal creds into a PSCredential object, as described in this post:

$secpasswd = ConvertTo-SecureString "HGgDB56VAww1kct2tQwRjOWBSkUOJ3iMDGEiEjpBZEQ=" -AsPlainText -Force
$mycreds = New-Object System.Management.Automation.PSCredential ("dc5216de-6fac-451a-bec4-9d2fb5568031", $secpasswd)

Security note: because you need to use the key explicitly in this command, you’ll want to avoid having it as is in your script (or it might end up getting pushed to a public repo by mistake!). Instead, you’d set up the CI server to make it available to you as an environment variable, and use that instead (or something along those lines).

We are now able to add the Service Principal account, e.g.

Login-AzureRmAccount -ServicePrincipal -Tenant 361fae6d-4e30-4f72-8bc9-3eae70130332 -Credential $mycreds

PowerShell is now using your Service Principal identity, and finally, we’re able to do stuff! Let’s list all the resources (e.g. Websites, databases, …) in the resource group that we were granted access to:

Get-AzureRmResource -ResourceGroupName MyResGroup

This should work!

But if we try it on some other resource group that we were not given access to, it will fail. e.g.

Get-AzureRmResource -ResourceGroupName OtherResGroup

This is RBAC doing its magic.

Conclusion

I know, it feels like a lot of steps to do something simple. Those steps will definitely get easier in the near future (there will be a way to create the Service Principal with one PowerShell command). But for now, with a little extra work it will let you automate your Azure Account in all kind of interesting ways, with the power of RBAC scoping access to exactly what it should be.

comments edit

GitHub pages make for a nice blogging platform if you like working with git and markdown. I blogged about it earlier this year.

But when it comes to embedding screenshots in your posts, it’s not obvious what the best approach is. In this post, I’ll first discuss a couple options that I didn’t like, and then suggest an approach that I think works pretty well.

Bad option #1: store your images in your git repo

Since your GitHub Pages blog is based of a git repo, there is something to be said for storing your images in the repo itself, so that they are versioned alongside your markdown.

The steps to do this would go something like this:

  • Use something like the Snipping Tool to select the desired area of the screen.
  • Save it in the images folder of your GitHub Pages repo, giving it a meaningful name
  • Reference it from your post using something like this: ![something cool](/images/SomethingCool.JPG)
  • Add and commit the image to your repo

Why I’m not using this approach

There are a couple reasons why I don’t use this approach.

The first is that it’s a heck of a lot of steps that you have to go through for each image. When you’ve previously used a tool like Windows Live Writer where you just drag and drop images into your post, it’s a major drop in productivity.

The second reason is that I have a serious aversion to storing binaries in git repos. Each image forever remains in the repo history, making it irreversibly bloated. Sometimes, you may need to make adjustments to previously published images, piling on more crap onto your repo. You may see it as a benefit to have the full and true history tracked by your repo, but for me the drawbacks really outweigh the benefits.

Bad option #2: use an external image sharing site

I use MarkdownPad 2 to author my markdown. It has a convenient option to upload an image to Imgur and insert the right markdown. Other markdown editors have similar options.

Why I’m not using this approach

I simply don’t trust those external image hosting services to stay around forever. Have you heard of Twitpic? It almost disappeared a month a ago along with all your cherished images. It got saved at the eleventh hour, but clearly it’s quite a gamble to trust these sites for posterity. Don’t do it!

Suggested option: use GitHub issues to store your images

GitHub issues has a very cool feature that lets you effortlessly drop images into an issue. It automatically uploads it to its cloud and inserts the right markdown.

Here is how we can abuse this feature for our GitHub Pages posts:

  • For each blog post, create a new issue, to keep things organized. e.g here is the issue I’m using for this post.
  • When you need to embed a screenshot, get it into your clipboard using your tool of choice. I just use the Windows Snipping Tool.
  • Go to the GitHub issue and paste it right into the comment. And bang, magic happens and GitHub gives you the markdown pointing you the cloud hosted image. It will look like ![image](https://cloud.githubusercontent.com/assets/556238/5241760/e17ae9f4-78d9-11e4-86f5-6e168adcea87.png)
  • Paste that markdown in your post, and you’re done!

Here is an example:

image

Various tips about using these ‘fake’ GitHub issues:

  • If you have multiple images, you can add then to the same comment in the GitHub issue. Or you could create additional comments in the same issue if you prefer. It really doesn’t make much difference.
  • It’s a good idea to name the issue after the blog post, to keep things tidy
  • When I create these issues, I close them right away, since they are not real issues.

Why I like this approach

This approach is undeniably a hack, as it uses GitHub issues in ways they were not intended. Despite that, it adds up to a decent solution for me.

First of all, the workflow is quite efficient. Once you have the issue created, you can go through all the steps in just a few seconds (after having captured the screenshot in the Snipping tool). It’s still not quite the Live Writer experience, but it gets pretty close.

And second of all, it keeps your repo mean and lean!

The elephant in the room here is that this technique is not fundamentally different from my Bad option #2 above. In both cases, the images are stored in some cloud somewhere, and if that cloud was to evaporate, your images would be gone.

So what makes one bad and the other one good? Well, the reasoning is that by using GitHub pages, you’re already trusting GitHub to host your repo as well as your live blog. So in a sense, by relying on Issues (on that same repo), you’re just extending your use of GitHub, rather than take an additional external dependency. And I generally trust GitHub to stay around longer than those various image hosting services that lack any tangible business model.

Now, if you’re reading this post and see a broken image above, you can laugh your ass off and say that I was wrong.

comments edit

tl;dr

I ordered a carbon monoxide detector from a 3rd party Amazon seller and they sent me one that’s way past its expiration date. I tried to write a negative seller review, and found myself sucked in the Kafkaesque world of Amazon Support. In the end, I never was able to get my review posted, despite trying pretty much everything.

I don’t know if this is particularly interesting to others, but in any case, this is the story…

The perfect seller

October 5th: My carbon monoxide detector had reached the end of its life, so I did what I always do: I went to Amazon and looked for a replacement. I quickly settled on this model which has good reviews.

Where it gets interesting is when I found I could save a tiny bit by going with a 3rd party seller instead of Amazon. The difference was under a dollar, but it was just as simple, so my cheapness sense took over, and I went with that.

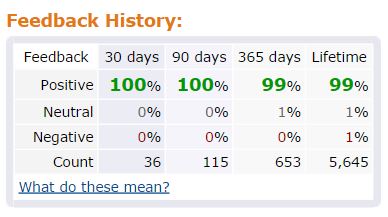
Of course, I checked the seller ratings: 100% positive over the past 3 months, and 99% lifetime. Surely, I had found the world’s most trustworthy seller: Great Lake Toys:

Seller ratings

Dreams shattered

It arrived quickly (Go Prime!), and I proceeded to install it. As I was writing the date on it (always a good habit), I noticed a disturbing detail: it had been manufactured on July 19, 2007!

Expired detector

So wait, this detector is rated good for 5 years, but was made over 7 years ago? For a device that’s supposed to save my family in case of a CO leak, that’s not exactly what I want to see. Time to give them a one star review:

I ordered a Carbon Monoxide detector. When I opened it, I saw that the date of manufacture was July 2007, more than 7 years ago!! For a safety device that is supposed to last 5 years, that is a scary finding. I’m guessing that it’s been sitting in a garage for 7 years, and that it will not be performing well. And I’m not seeing an obvious way to contact the seller to get a fresher replacement :(

Rejection

October 13th: I get a response from Amazon that my review had been rejected, with message:

Feedback submitted was a product review and not related to seller

WTF?!

October 19th: I write back to Amazon

My review of this product was removed with the comment “Feedback submitted was a product review and not related to seller”.

This is not a correct resolution. I’m sure the product in general is fine. The problem is that the specific detector that the seller sent me was manufactured in July 2007, and is way too old to be used as a life safety device.

This is not a product review, but a case of the seller sending an item that is too old to be sold to customer. Hence it is absolutely a seller issue.

Also, there appears to be no way of contacting the seller.

I would appreciate if you could restore my review, and let me know what my options are.

October 20th: Amazon replies

I’ve forwarded the details you sent us to our investigations team. Each report they receive is investigated and the appropriate action is taken. However, we won’t be able to release the outcome of the investigation.

Anytime you buy from a seller, we encourage you to rate the seller’s performance through feedback. You have 90 days from the date of your order to leave a rating and comments on your experience. I’d suggest you to please resubmit your review.

Best regards, Yogesh P

That was the first promise to send my case to the ‘investigation team’.

As for resubmitting my review, brilliant idea, except for one small detail: the button to submit a seller review is no longer there…

October 21st:

Hi Yogesh,

Thanks for your reply. I’m not finding a way to re-submit my feedback. I see the item under ‘order history’, but there is no ‘Leave Seller Feedback’ button.

Please advise how I can restore my feedback.

Thanks, David

I then ‘pinged’ then twice more as I was not hearing back. I can be persistent :)

October 26th:

Hello,

I understand that you want to re submit the feedback with the seller.

I’m sorry; once feedback for a seller has been removed or posted, it can’t be restored or re-submitted as new feedback for that seller.

Best regards, Swathi

Ok, now they’re starting to piss me off.

Hello,

I think there is a misunderstanding here. I did not remove the seller review. It was removed by Amazon, and it was done mistakenly as discussed. Can you please re-enable the ability for me to repost my review?

Thanks, David

Same day, I hear back:

Hello,

I have forwarded this issue to our community review department, they receive is investigated and the appropriate action is taken. Your comments and suggestions will help us improve our store and offer better service to our customers.

They will write back to you after investigate the issue.

Best regards, Shalu S

That was the second promise to have the review department take a look. Still, I’m a nice guy, so I show some appreciation for her fine work:

Thank you Shalu, your help is appreciated.

David

And within minutes, I hear back:

Hello,

Thanks for writing back with your kind words. I’m glad to hear that my colleague, Shalu, was able to assist you, and I’ll be sure to forward your message.

We look forward to seeing you again soon.

Best regards, Inderjeet S

So now this guy is acting like all my issues have been resolved, and he’s super happy that his colleague was able to help me. That’s very nice.

Only problem is: I never hear back from them, nor from the now-infamous (and probably non-existing) ‘review department’.

November 6th

For the fun of it, I decide to post my original seller review as a product review. After all, the reason it got rejected in the first place was that they claimed it was a product review, so let’s play along!

Later that day, I get a reply:

Hello David,

I hope this email finds you well. This is Kath from the Communities team.

We encourage reviews on Amazon.com website, both positive and negative.

However, your recent review titled “Received expired carbon monoxide detector” for “First Alert CO600 Plug In Carbon Monoxide Alarm “ doesn’t comply with our customer reviews guidelines. Specifically, your review isn’t a review of the product itself, but rather a review of the seller from which you ordered.

Best regards, Kath A.

You don’t say!

Just give me a new one

November 7th

I finally get around to returning the item, and ordering a new one from real Amazon (i.e. not a 3rd party seller). The returning part was smooth enough, and the new detector was as fresh as it gets.

Expired detector

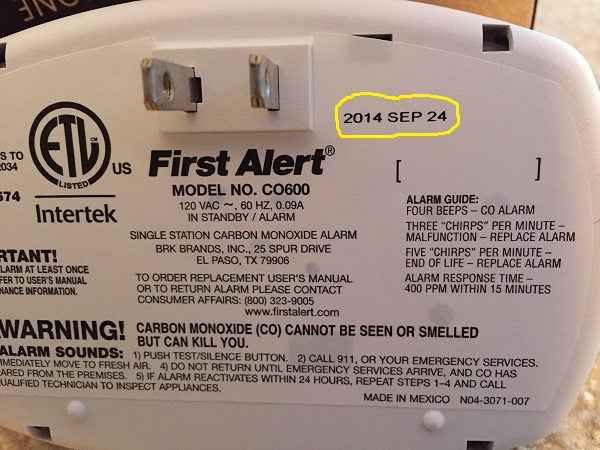
It was manufactured on September 24th 2014, less then two months earlier! Very nice, and it confirms that how unacceptably stale the initial detector was.

Chat time

Now you might say that my problem is solved, as I’m in possession of a freshly minted detector. But part of me really wants to answer the question: is it at all possible to post a negative seller review?

So I decide to keep the fun going a bit. This time, I choose to go with a direct chat with customer service.

You are now connected to Ravi from Amazon.com

Me:I’m trying to write a Seller review for this order (107-3573704-4046606) but I’m not able to. Can you please help?

Ravi:Hello, my name is Ravi. I’ll certainly try to help regarding your concern.

Me:I wrote a review back on 10/19, but it was incorrectly removed with the comment “Feedback submitted was a product review and not related to seller”

Ravi:Hi, David. I’m so sorry to hear this from you. Let me help you. Please provide the issue in detail.

Me:When I opened it, I saw that the date of manufacture was July 2007, more than 7 years ago. But the detector is only good for 5 years, so it is expired.

Ravi:I’m so sorry for the inconvenience. Are you referring to this item? First Alert CO600 Plug In Carbon Monoxide Alarm.

Me:Yes, that is correct. It’s a life safety device, so I don’t want to take chances with such an old item.

Ravi:Let me help you in this issue. I’ll go ahead and request for the return label to return the item for full refund. I suggest you to please return the expired item back to us for the full refund. I can assure that this won’t happen again.

Me:I’ve already initiated the return today. But my issue here is that I’d like to leave a Seller review and I’m not able to.

Ravi:This item is fulfilled by Amazon. So we’ll will take care of this issue. We’re the responsible for this inconvenience. In addition to our large selection, one of the benefits we try very hard to offer our customers is convenience. I’m very sorry for the inconvenience you experienced in this case.

Me:On the seller’s page, I see reviews by other users who have bought from them, so it is possible to leave reviews for the specific seller. But right now I am not able to. The problem is that my review was incorrectly removed saying it was a ‘product review’, which it wasn’t. It’s a seller review. But now the site won’t let me resubmit it

Ravi:I can understand your concern.

Me:This is the page with user reviews: link

Ravi:I’ll go ahead and forward this feedback to the investigation team.

Me:They have lots of new reviews everyday by users. I just want to add mine. Note that I made that same request earlier and they also said they’d forward to investigation team. But I did not hear back. Is there a way you can check the status of previous investigation?

Ravi:Sure, David. I’ve forward this issue to our investigation team.

Me:Thanks Ravi. Will I hear back from them via email?

Ravi:The investigation team will take the appropriate steps and should hear within 1-2 business days.

Me:Ok, thanks Ravi for your help. I will be awaiting follow up from them.

Ravi:Sure. You’re most welcome. Is there anything else I can do for you today?

Me:No, thank you, that was it.

Ravi:You’re welcome! It’s certainly my pleasure assisting you. Thanks for contacting Amazon. We hope to see you again soon. Have a good one! bye!

Ok, so that’s now the third promise to have the investigation team look it it!

November 16th

I haven’t heard anything back, so time for another chat with my Amazon friends!

You are now connected to Jeric from Amazon.com

Me:I had a chat with customer service (Ravi) relating this item on 11/7. He said an investigation was being launched and that they would get back to me within 1-2 business days, but I have not heard back. I’d like to check the status.

Jeric:Hello David , my name is Jeric. I’m sorry to know that you haven’t yet received the response. No worries, I’ll be glad to check this for you and see what I can do to help.

Me:Thank you Jeric

Jeric:It’s my pleasure David. I will need to gather additional information may I place you on hold for a couple of minutes?

Me:Yes, no problem.

Jeric:Thanks David, please hold on. Please bear with me David. Thank you for holding David. Just to be sure you are referring to your feedback to the item you received expired, right David ?

Me:Yes, specifically the seller feedback that I have not been able to re-submit I did initially but it had been mistakenly removed

Jeric:Thanks for verifying David. I checked the issue and I am sorry that you haven’t yet received the response. I’ll go ahead and forward this issue to our team.

Me:Were you able to find a record of the previous request for investigation?

Jeric:Yes David but I am not able to find the response yet. I’ll go ahead and resubmit your concern about the issue. I also suggest that you can write your review for the item.

Me:I cannot submit it right now, because the button to do this is gone. That’s in fact the reason I had to contact service. If I was able to post the review, I would have just done it.

Jeric:Oh. I am so sorry to know that David.

Me:Please make it clear to the investigation team that this is now the 3rd time that a request is made to them. Each time I’m being told that I’ll hear back soon, and it never happened.

Jeric:David can you please try this link: link

Me:This link is for a product review. I want to post a seller review. This is the seller link: link

Jeric:Thanks David. Can you please try if this link will work: link

Me:this seems different from a seller review. A seller review is one that would end up showing up on the seller page for others to see. While this one appears to be a way to contact Amazon.

Jeric:Thanks so much David. I will also re-forward your issue to our team fro the investigations.Customer feedback like yours really helps us continue to improve our store and provide better service to our customers.Customer feedback like yours really helps us continue to improve our store and provide better service to our customers.

Me:Thank you. When should I expect to hear back?

Jeric:The team will responds once the investigations is done. According to my experience it takes 1-2 business days David.

Me:Ok, I will wait for this. Thanks for your help.

Jeric:You’re always welcome. It’s my pleasure to help you. Did I cover all your concerns for today? If you have another issue I’ll be more than happy to assist you with this.

Me:That was the only issue, thanks.

Jeric:It’s my pleasure David. Thanks for visiting Amazon.com and have a great day! Bye for now :)

So now for the fourth time, my case is sent to the hard working investigation team. And of course, I never hear back. This is the point where I decide that it isn’t much fun anymore, and I concede defeat against an insurmountable enemy.

Conclusions

If you’ve read this far, the first conclusion is that you have no life, and that you are thinking the same thing about me. That puts us on even ground.

The second conclusion is that Amazon Seller ratings are basically a scam. Positive reviews go in (if they’re even real), while legitimate negative reviews get rejected. Naturally, that leads to questionable sellers getting extremely high ratings.

I’ve been wondering what incentive Amazon has to protect 3rd party seller ratings so much. My guess is that there is some shady money deal between them that leads to that. It does seem strange that a company like Amazon would do this, but it’s not implausible.

But then again, as the saying goes “Never attribute to malice that which can be adequately explained by stupidity”. So it’s conceivable that it is a case of extreme incompetence. But that’s a lot less fun, so I’ll go with the conspiracy theory.

Time to go to sleep and breath in some deadly odorless gas.

comments edit

We just added some preliminary support for deploying ASP.NET vNext projects to Azure Websites using git.

You can easily try it yourself: Clone my test project. Then Create an Azure Website with git enabled. Then just push the repo to Azure.

And that’s it, your ASP.NET vNext site is up an running in Azure!

Here are various additional notes:

  • the support is alpha-level at this point, just like everything relating to ASP.NET vNext
  • it only support vNext solutions created by Visual Studio 2014 CTP
  • we’ve only tested with the alpha3 release of the K runtime
  • the first deployment takes a bit over a minute as it has to download a bunch of NuGet packages. Subsequent deployments are quite a bit faster
  • when running the deployed site, the cold start time is on the slow side. vNext is still very new, and there are lots of things left to tune and optimize!

Anyway, give it a try, and let us know what you think! Please report issues to https://github.com/projectkudu/kudu.

comments edit

My preferred method of deploying to an Azure Web Site is using git, partially because this is a feature I’ve been involved with from the beginning (it’s known as Kudu).

However, in some cases, I just need to deploy a bunch of files from my local machine with minimal fuss, and using git is overkill. For these scenarios WebDeploy (aka msdeploy) really shines.

The problem with WebDeploy is that using it from the command line can be rather challenging. After you download the publishing profile (from the dashboard), you have to extract a bunch of chunks from it. From those chunks, you can piece together this charming command line, which will deploy a local folder to your Azure Web Site:

msdeploy.exe
    -verb:sync
    -source:contentPath="c:\FolderToDeploy"
    -dest:
        contentPath='MyAzureSite',
        ComputerName="https://waws-prod-blu-001.publish.azurewebsites.windows.net:443/msdeploy.axd?site=MyAzureSite",
        UserName='$myazuresite',
        Password='fgsghfgskhBigUglyPasswordjfghkjsdhgfkj',
        AuthType='Basic'

WAWSDeploy to the rescue

To make things easier, I wrote a little tool which makes this as simple as it can be. You still need to download the Publish Profile, but then you simply run:

WAWSDeploy c:\FolderToDeploy MyAzureSite.PublishSettings

So basically, you tell it where your files are, and where they need to go.

As an alternative, you can have it deploy from the content of a zip file, e.g.

WAWSDeploy c:\MyFiles.zip MyAzureSite.PublishSettings

To get the tool, you can either build it yourself from the sources, or get it from Chocolatey.

Random notes:

  • it’s best used for simple sites that don’t need any build steps (so not for ASP.NET MVC)
  • it’s just a fun little tool I wrote on the side, and not a supported Microsoft thing
  • WebDeploy only works on Windows, so WAWSDeploy has the same limitation

Let me know if this is useful, and feel free to send a PR if you find issues or want to improve it.

comments edit

Yesterday, I tweeted:

Every Time someone enables #nuget package restore on a solution, a kitten dies. Learn the new workflow!

It got a lot of RTs and Favs, but based on a number of comments, I think I may have caused some confusion, because it is in fact a confusing topic.

So first, let’s get one thing out of the way: I am not suggesting that you commit your NuGet packages into your git repo! That is the worst thing you can do, and if you do that, you’ve moved on to killing unicorns.

The NuGet docs explain it all, but it’s a little hard to read through, so I’ll try to summarize the key points here. I’m keeping things concise, so please read that page for the complete story.

The old way to do package restore

In the old way, you right click on your solution in VS and choose Enable package restore. This causes VS to modify your csproj files, and create .nuget folder containing nuget.exe and some other files.

After that, your packages get restored as part of msbuild when you build your project.

Don’t do this! I hope the NuGet team will remove that option soon, and point people to…

The Right way to do package restore

What the NuGet team is now recommending is both a lot cleaner and a lot simpler. In short, you don’t do anything special, and it just happens! This is because NuGet now always restores packages before building in VS. So no changes whatsoever are needed on your files, which is beautiful!

Note: when building from the command line, you need to run ‘nuget restore’ yourself before msbuild. You could argue that scenario became harder than before, but it’s for the greater good.

Converting from the old way to the new way

The NuGet team has a document that takes you step by step. In an ideal world, it would be automated, but going forward, if people stop using the Old Way on new projects, the issue will disappear over time.

What if you have custom package sources?

All you need to do is create a NuGet.Config file next to your .sln file, containing:

<?xml version="1.0" encoding="utf-8"?>
<configuration>
  <packageSources>
    <add key="nuget.org" value="https://www.nuget.org/api/v2/" />
    <add key="aspnetwebstacknightlyrelease" value="https://www.myget.org/f/aspnetwebstacknightlyrelease/" />
  </packageSources>
</configuration>

Note that if you have private package sources that you want to keep out of your repo, you can add them to %APPDATA%\NuGet\Nuget.config (see this page) for details.

comments edit

Yesterday, I blogged about my reasons to move away from Blogger, and why I picked GitHub pages to replace it. Today, I’ll discuss some of what I went through to port my old blog over.

I’m not going to go in great details about parts that have been discussed everywhere, like using GitHub pages.

Porting the comments to Disqus

I thought this would be the hardest part, but it turned out to be quite easy. I already had a Disqus account that I needed earlier in order to comment on other sites. All I had to do was add my own site to it, and tell it to import all comments from Blogger. One little OAuth workflow later, all my comments were on Disqus!

Getting Jekyll installed

First, I had to get Jekyll running on my machine, which is quite a bit more painful on Windows than on Mac/Linux. I found a good post that guided me through all the steps, and there sure are quite a few of them!

Even though I have it working, it produces some weird errors/warnings that appear to be harmless:

D:\Code\Github\davidebbo.github.io>jekyll build
Configuration file: D:/Code/Github/davidebbo.github.io/_config.yml
            Source: D:/Code/Github/davidebbo.github.io
       Destination: D:/Code/Github/davidebbo.github.io/_site
      Generating... C:/Ruby200-x64/lib/ruby/gems/2.0.0/gems/posix-spawn-0.3.8/lib/posix/spawn.rb:162: warning: cannot close fd before spawn
'which' is not recognized as an internal or external command,
operable program or batch file.
done.

So cannot close fd before spawn, and missing which (even though I have that on my PATH from git). Whatever, it still works so I’m ignoring that.

Porting the posts

That’s where things got nasty. The Jekyll import page makes it look really easy: install the jekyll-import gem and profit.

Sadly, I just couldn’t get that damn gem to install, and after some investigation, I concluded that it’s just busted on Windows (see this thread).

If I had any common sense, I would have switched to using my old MacBook Air, which probably would have worked. But I didn’t have the Mac with me at that time, and I didn’t want to wait. So I did the usual dumb thing that devs do: I wrote my own conversion tool from scratch!

To make things more interesting, I had decided ahead of time that I didn’t want to keep my old posts as HTML (even though Jekyll supports that), and instead wanted everything as Markdown. Just because.

So here is the tool I wrote for the job.

Warning: it’s all dirty, hacky, and comment free. I wrote it for this one-time purpose, it did the job, and now I’m done with it. I had fun doing it, too! If someone finds a need for it, be my guest, but expect roughness :)

High level, here is what it does:

  • reads the big XML file that I downloaded from blogger, which contains all the posts and comments (of course, I don’t care about the comments at this point).
  • extracts all the Post’s metadata out of it: title, date, tags, …
  • gets each post’s content, and convert it for HTML to Markdown. I used the brilliant Html Agility Pack to parse the HTML (I’m not crazy enough to do this from scratch). And then I just went through the tags to convert them to Markdown.
  • writes out all the Jekyll/markdown files, preserving the original URLs

It’s only good enough to convert the pretty restricted HTML that my posts were using. I’m sure if you throw some arbitrary HTML at it, you’ll get some quality vomit out of it.

Dealing with images

This is one part where I fell a bit short. The right thing to do is to bring all the images into the git repo so it’s all self-contained.

But I got lazy, so I ended up continuing to point to their original blogger location, which I’m sure I will sorely regret in 2019 when they suddenly disappear.

Styling the blog

I have no talent for styling, and no css skills, so the goal was to find a fully ready theme. I started using one from jekyllthemes.org. But then I decided I didn’t like it, so I ended up just ripping off Phil Haack’s blog, because I figure if it was good enough for him, it must be good enough for me (and he didn’t mind).

If you look carefully, you might notice some hints of similarities :)

comments edit

For the past few years, I’ve had my blog hosted on blogger, and for the most part, I hated it. While Windows Live Writer was helping make the authoring experience bearable, in the end there was no getting away from the fact that I hate HTML!

On the other hand, I love Markdown, so I knew I had to move to a system that let me just use that directly. But when I asked on Twitter, people threw all kind of interesting options at me, and I had to make a choice. In the end, I went with Jekyll/GitHub pages, so I’ll use this post to discuss the thought process.

Here are some of the other options I looked at based on people’s suggestions.

Ghost

Using Ghost was really tempting. It’s new and shiny, it has a clean interface, and it has a very nice browser hosted Markdown editor. Also, it runs great on Azure Web Sites, which is what I work on.

But then I realized something else: I hate databases. And I love files :)

I just didn’t want to deal with a system where my posts ended up somewhere in a database. So that was that.

Orchard

Orchard also has nice Markdown support, which looked like a potential option.

But for the same reason as Ghost, I didn’t want to go down that route.

Sandra.Snow

Several folks suggested that I look at Sandra.Snow, which is a .NET based system inspired by Jekyll. Being a .NET guy, it was tempting instead of using something based on Ruby/Python.

But this came with a big catch: if I used it with GitHub pages, I would need to locally generate the HTML, and then commit that to my repo. And the very thought of committing generated files to a repository makes me sad.

Another big one is that it would not have allowed me to tweak posts online and have them just go live.

Site44

Steve Marx suggested site44, which would let me publish my blog simply by adding files to a dropbox folder. And that’s certainly a cool way to publish files with no fuss.

But similarly to Sandra.Snow, I would have had to run Jekyll manually to create HTML files each time I want to publish, and I decided that wasn’t for me.

GitHub pages with Jekyll solved most issues

While not perfect, using GitHub pages with Jekyll provides a workflow that best matched what I was looking for:

  1. No database: it’s just a bunch of files. Yeah!
  2. No HTML: that’s not completely true, as I did install Jekyll locally, and when I run it, I get local HTML files. But I think in most cases when I’ll want to author a new post, I’ll directly push my new Markdown file and let GitHub do the dirty work.
  3. Built-in history: it’s a git repo. Enough said!
  4. Browser based editing: Github’s editor is rather awful (e.g. compared to Ghost), but it’s good enough to tweak existing posts. I hit save, and in under a minute, it’s live on my blog. I can do this from my phone if I need to. This would not be possible with Sandra.Snow or Site44.
  5. Collaborative workflow: if someone finds a typo is my post, they can just send a pull request. And then I can accept it without leaving my browser. This is brilliant, and none of the other 4 solutions above provide this.

Well, it’s too early to say that the end to end workflow is working great for me, but hopefully time will prove that it was a wise decision, as I’m not planning another move for a while!

comments edit

Windows Azure Web Sites provide a nice selection of ways to deploy a site from source code. You can deploy from:

  • a local git repository
  • a TFS project
  • a git project on GitHub
  • a git or Mercurial project on Bitbucket
  • a git or Mercurial project on CodePlex
  • code in a Dropbox folder

One thing that all these approaches have in common is that you own the code. e.g. in the GitHub case, you must be an admin on the project. The reason is that Azure needs to set up a hook in the project to enable continuous deployment, and only project owners can do that.

Deploying ‘external’ repositories you don’t own

In some scenarios, it can be interesting to deploy a site based on sources that you don’t own. For example, you might want to deploy your own instance of the NuGet gallery, but you have no intention to modify the source. You’re happy with it as is, and you just want to deploy it.

To cater to this scenario, we added a new ‘External repository’ entry in the Azure portal:

image

Note: the ‘External repository’ entry is using the git icon, which is technically incorrect since it supports both git and Mercurial. We just didn’t have time to come up with a better icon for it for this initial release! We’ll probably change that later.

Once you pick that, the next page in the wizard is pretty simple: you just paste any http(s) git or Mercurial URL and you’re good to go!

image

And as soon as you Ok the dialog, a deployment from that repository gets triggered.

What about updates?

One important point about this mode is that it doesn’t support continuous deployment. This is because Azure cannot possibly register for change notifications on an arbitrary repo that you don’t own.

Concretely, that means that your site will not be automatically deployed when the repo is updated. Instead, you need to tell it when you want to pick up changes, by clicking the Sync button in the Deployments page:

image

While this feature may not see the same kind of usage as the full continuous deployment workflows, it has its uses and nicely completes the overall source deployment story in Azure Web Sites.

comments edit

This topic is not specific to git publishing, but it’s particularly useful in that scenario

In its first release, the Azure portal had a couple of limitations relating to database connections:

  • The database name had to match the connection string, which was quirky
  • You could not add external connection strings

The good news is that both limitations have now been removed, as you’ll see here.

Using a SQL Azure database associated with the site

Let’s say you’d like to publish the awesome NuGet Gallery to an Azure Web Site. When you create the site in Azure, choose the ‘Create with database’ option:

image

You will see a dialog that looks like this:

image

Let’s assume that you don’t have a database yet, and you’d like one to be created for you. All you have to do here is give Azure your connection string name (highlighted above).

So where does this ‘NuGetGallery’ string come from? It’s simply the name of the connection string from the app’s web.config:

image

This way, you don’t need to change your sources to point to the SQL Azure database. You instead rely on Azure to use the right connection string at runtime.

After the following step, you can complete the wizard by either creating a new DB Server or use an existing one. Note that the database itself can be named anything you like (or keep the random name), since it is now decoupled from the connection string name.

At this point, you can just ‘git push azure master’ the NuGet Gallery sources, and your site is up and running with no further configuration!

Now if you go into the Configure tab for your site, you’ll see your associated connection string:

image

Note that it’s hidden by default, but you can choose to display it if you need it (e.g. if you want to connect via SQL management studio). You can even edit it if you want to tweak it!

Working with external connection strings

In the scenario above, we were using a database that Azure created for us along with the site. In some cases, you will instead need to work with an existing database, which may or may not be hosted on Azure.

In that scenario, you’d create your site without any databases. Instead, you can manually add the connection string in the Configure tab, e.g.

image

Note: don’t forget to click the Save button at the bottom of the page when you’re done!

Note that as before, we’re naming the connection string after the one in web.config. The only difference is that the value now comes from you instead of coming from Azure.

comments edit

Update (9/17/2012): as of today, Azure Web Sites have direct support for A record, so the hack below is no longer necessary!


Warning: the following is just something that worked for me, and that others asked me about. It is not a Microsoft approved technique, and it could cause your cat to self-combust with no warning. I’m just a guy trying random things here.

Windows Azure Web Sites (WAWS) support custom domain names, as documented on this page. This makes it easy to use a name like www.davidebbo.com, by setting up a CNAME record in your DNS.

But a lot of people are asking how to make the name just davidebbo.com, which is known as a naked domain (aka a bare or root domain). Normally, this is done by setting up an A record, but this requires a stable IP address, which is not currently available in WAWS.

But it turns out that you can use use a CNAME for the naked domain, even though many people say it’s a bad idea (more on this below).

I’m not sure if this works with all registrars, but I use NameCheap, and it works with them. Here is what it looks like in the NameCheap DNS records:

image

So I’m doing two things here:

Then I have the following in the Configure tab of my WAWS:

image

Though really, I only need the last entry since I’m redirecting www to the naked domain. I just left the www entry in there because it doesn’t hurt. The first one could go too.

So what’s wrong with doing this?

If you search around, you’ll find a number of pages telling you that it’s unsupported, and breaks RFC1034 (e.g. see this page). And I’m sure that the experts will crucify me and call me an idiot for blogging this, but heck, I can live with that!

Personally, I don’t care so much about breaking an RFC, as much as I care about breaking my award winning http://davidebbo.com/ web site, which brings me most of my income.

So what might break? From what I’m told, doing this breaks MX records, which matters if you’re running an email server under your host name. So if I wanted to be me@davidebbo.com, I probably couldn’t. But I don’t, so I don’t care. It might also affect other types of records that I’m not using.

All I can say is that so far, I’m yet to find something broken about it, and I’ve heard from several others that they’ve been using this successfully for a while (not with WAWS, but that shouldn’t matter).

Anyway, I think you get my point: try at your own risk! And sorry about your cat.

comments edit

A few days ago, I discussed how the git support in Azure Web Sites was written as an Open Source project called Kudu. This time, I’ll give a few more details on how to run it, both locally and on Azure.

To be clear, you don’t have to care about any of this if you just want to use git deployment to Azure. Just use it as is and it should work great!

This is for folks who are interested in modifying the git deployment engine itself, either to contribute some changes to the project, or just to play around with things.

Running Kudu locally

First, you can see it all in action in this 3 minute screencast!

Here are the basic steps to run Kudu locally. Note that this requires using IIS7, and will not work with IIS Express.

  • Clone it from https://github.com/projectkudu/kudu.git
  • In Visual Studio, open Kudu.sln. Important: VS needs to run as administrator!
  • Set Kudu.Web as the Startup solution
  • Ctrl-F5 to run
  • You’ll get an admin page that lets you create sites, and gives you the git URL for them
  • Try git pushing a test project, and see it run!

Important note: the primary purpose of running Kudu locally is to make it easier to develop outside of Azure. Conceivably, you can take this non-Azure Kudu and host it on a VM, to have your own mini deployment server. However, it’s missing a few features that would make it really usable there. e.g. it doesn’t set up host names, and doesn’t set up authentication. We would love to add these features, and welcome contributions!

Running a private Kudu build on Azure

First, see it in action in this 5 minute screencast.

This is the more crazy one. Suppose you want to make changes to the Kudu service, and make it even more awesome. :) You can make these changes locally and test them outside of Azure, per the previous section.

But wouldn’t it be great if you could actually use your latest Kudu bits in Azure itself? Turns out you can, using a special hook that we put in for the exact purpose.

Here are the basic steps:

  • As above, clone Kudu from https://github.com/projectkudu/kudu.git
  • Make whatever changes you want to the sources
  • Run build.cmd at the root of the repo. This creates an artifacts\debug\KuduService folder than contains the built Kudu bits.
  • Go to the Azure portal and create a new app, then enable git.
  • Use FTP to connect to your files, and copy the KuduService folder at the root. Here is what the file structure looks like in there.
  • In the Portal, go to the Configure tab, and add an ‘app setting’ with name/value USE_PRIVATE_KUDU=1 (and don’t forget to hit Save at the bottom!).

And you’re done! If you now do a git push to your Azure site, you are now using your very own git engine instead of the one that comes with Azure. How cool is that? :)

Important notes:

  • Doing this only affects this one site. If you have multiple sites where you want to use your private Kudu bits, you’ll need to set up each of them the same way.
  • It probably goes without saying, but once you are running your own git deployment engine, you’re in unsupported territory, so don’t call product support if something doesn’t work! However, the Kudu team will always be happy to talk to you on JabbR, or our MSDN forum, or on github. :)

comments edit

Yesterday, ScottGu unveiled the new Azure, which brings a whole list of exciting changes to the platform.

One of the most exciting new features is the ability to deploy Web Sites to Azure using git. Scott’s post covers that, and I also did a screencast on that topic.

One part that has not yet been discussed is that the engine that powers this feature was developed as an Open Source project from the first line. The project is code named Kudu and can be found at https://github.com/projectkudu/kudu. Kudu is a member of the the Outercurve Foundation, and is released under the Apache License 2.0 (the same as NuGet).

This project is actually not tied to Azure, and can run standalone on any machine. In that mode, you can push project and have them run in your local IIS.

So why is this project interesting to you?

There are a few reasons that you may be interested in this project.

The first is that it’s a good place to file bugs that you run into when you git push your project to Azure. You can also use our forum to discuss things.

The second reason is that the associated wiki contains lots of useful info about it. Well, at this time there isn’t all that much there, but the idea is that we’ll grow it as we go forward. And of course, wiki contributions are welcome!

And finally, you may be interested in contributing to the project, as we do accept contributions!

comments edit

I have just moved T4MVC to a new CodePlex project, instead of it being part of the MvcContrib project. Its new home is https://t4mvc.codeplex.com/.

If you’re a T4MVC user, that should not make much difference except that there is now a new place to discuss it and file bugs. NuGet is still the place to go to get T4MVC!

Note that T4MVC is still part of the MvcContrib effort, even if it doesn’t share the same source tree. Here are the reasons for the move.

Reduce confusion

T4MVC is quite separate from the rest of MvcContrib, because it’s just a T4 template, and not some code that’s part of an assembly. Having the T4MVC files be in their own little island in the middle of a repo with many unrelated thing has been a bit of a barrier of entry for people wanting to make a quite contribution.

Also, since all MvcContrib bugs are files in the same place, there was always additional pain for me to filter T4MVC issues from unrelated ones.

Likewise, we’ll now have our own discussion forum that only focuses on T4MVC. Most users have been using StackOverflow for T4MVC support, and you can continue to do that if you prefer.

Switch to git!

I’ve been increasingly using git over Mercurial (like everyone else it seems!), to the point where having to use Mercurial is becoming an annoyance. Since CodePlex now supports git, it was the perfect opportunity to switch to that!

comments edit

Mono comes with a really cool CSharp compiler as a service. The only problem is that no one seems to know about it!

I think the main reason for this is that anything related to Mono causes a fair bit of confusion to all the people who are not familiar with it. And that certainly includes myself, as I know very little about it besides what I’m discussing in this post!

Talking to various people, the general misconceptions are:

  • Mono only runs on Linux
  • Even if it runs on Windows, it doesn’t use the CLR, so I can’t use it
  • Mono is for strange people :)

And while that may be true for some aspects of Mono, it certainly isn’t for Mono.CSharp.dll. In fact, it’s a totally ‘normal’ library that you can use in your very ‘normal’ C# projects in Visual Studio.

The next hurdle is that it’s not all that easy to just get Mono.CSharp.dll. You have to either install an 80MB setup from here, or get a big .tar.gz file with lots of other things from here. And a lot of people on Windows don’t like dealing with tar.gz files (hint: use 7zip).

Now the good news: after chatting with Miguel de Icaza on Twitter, I put Mono.CSharp.dll on NuGet, making it totally trivial to use from VS. There goes that hurdle. (note: I’m the package owner for now, until some Miguel-blessed dev claims it).

Try Mono.CSharp in under 5 minutes

Just open VS and create a Console app, and add a NuGet package reference to Mono.CSharp. That takes a whole 30 seconds. And I’ll re-emphasize that there is nothing ‘Mono’ about this Console app. It’s just plain vanilla.

Now write some basic code to use the compiler. It all revolves around the Evaluator class. Here is the sample code I used (GitHub). It’s quick and dirty with poor error handling, as the focus is to just demonstrate the basic calls that make things work:

using System;
using System.IO;
using Mono.CSharp;

namespace MonoCompilerDemo
{
    public interface IFoo { string Bar(string s); }

    class Program
    {
        static void Main(string[] args)
        {
            var evaluator = new Evaluator(
                new CompilerSettings(),
                new Report(new ConsoleReportPrinter()));

            // Make it reference our own assembly so it can use IFoo
            evaluator.ReferenceAssembly(typeof(IFoo).Assembly);

            // Feed it some code
            evaluator.Compile(
                @"
    public class Foo : MonoCompilerDemo.IFoo
    {
        public string Bar(string s) { return s.ToUpper(); }
    }");

            for (; ; )
            {
                string line = Console.ReadLine();
                if (line == null) break;

                object result;
                bool result_set;
                evaluator.Evaluate(line, out result, out result_set);
                if (result_set) Console.WriteLine(result);
            }
        }
    }
}

It feeds it some starter code and start a REPL look to evaluate expressions. e.g. run it and try this. You type the first two, and the 3rd is output:

MonoCompilerDemo.IFoo foo = new Foo();
foo.Bar("Hello Mono.CSharp");
HELLO MONO.CSHARP

You get the idea!

What about Roslyn?

I blogged a few months back about using Roslyn to implement an MVC Razor view engine. I’m far from a Roslyn expert, and frankly haven’t done much with it since that post. From what I read, Roslyn has the potential to enable some very compelling scenarios in the future.

But there is one major argument right now in favor of using the Mono compiler: it’s pretty much feature complete today, while Roslyn is not even close. Totally understandable given that it’s a CTP, and is only meant to give an early taste of the feature.

So anyway, I still know close to nothing about Mono, but if I need to dynamically compile some pieces of C# in a ‘normal’ non-Mono project, I know that Mono.CSharp is not far away!

comments edit

Update 12/29/2011: the Roslyn CTP is now available on NuGet, so it’s no longer necessary to install it before running this sample!


Note: the code for this view engine sample is on Github.

The C# team has just announced the public availability of the first Roslyn CTP. See their post here, and download it from here. I really hope they can make it available on NuGet soon, but right now it’s not there, so you’ll have to run their setup. Sorry!

As you’ve probably heard from various conferences earlier this year, Roslyn offers a compiler as a service for C# and VB. Since we do a lot of compilation in ASP.NET land, I figured I’d play around with trying write an MVC view engine that uses it instead of the standard compilation path.

Word of warning: the Roslyn CTP is still very rough and is missing a lot of key features, like dynamic, anonymous types, indexers and using statements (get the full list here). So while I did get something working, the language limitations prevent it from being useful in any real scenario. This is just an exercise to see how far we can get. Lower your expectations! :)

Why would we want to do this

When you have a standard MVC project, compilation happens at two different levels:

  • Your Controllers, Models, and most of your C# code get compiled by msbuild (or Visual Studio) into a single assembly which ends up in the ‘bin’ folder
  • All the Views (whether .aspx or .cshtml) get compiled dynamically at runtime by ASP.NET.

One drawback of compiling views at runtime is that it’s pretty slow. And since it’s slow, ASP.NET tries really hard to save assemblies to disk so it can reuse them across AppDomain cycles. Those assemblies all go under the infamous ‘Temporary ASP.NET Files’ folder. There is a huge amount of complexity to make this work, with settings like batching which can either help or hurt depending on the situation.

One thing I’ve been working on to avoid this dynamic compilation is RazorGenerator, which lets you precompile your views into the same assembly as your controllers. This works quite nicely, but it does have one big drawback: you can’t just update a view and have it get picked up at runtime. Instead, you need to rebuild using msbuild (or VS), just like you would when you change a controller file.

What would be nice is to be able to support dynamic compilation of the views, but with a much lighter system then what the standard ASP.NET Build Manager provides. Enter Roslyn!

Compile views using Roslyn: fast and lightweight

The main reason that the standard build manager is pretty slow is that it goes through CodeDom, which launching csc.exe for every compilation. csc.exe is actually very fast at compiling C# code, but the fact that we have to pay for the csc process startup time each time we compile anything ends up making things slow.

By contrast, Roslyn gives us an API to compile code in memory, without ever having to launch another process, making things much faster. In fact, it is so fast that the incentive that we had to preserve compiled assembly in ‘Temporary ASP.NET Files’ mostly disappears.

Instead, we can take a much simpler approach: whenever we need to compile a view, we just compile it on the fly in memory using Roslyn, and then cache it for the lifetime of the AppDomain. But we never need to cache it to disk, and generally don’t use the disk at all.

In preliminary tests, I have measured the perf of compiling pages using Roslyn to be more than 50 times faster than doing it via CodeDom. So it’s looking quite promising!

So to summarize, the benefits of using Roslyn to implement a view engine are:

  • Fast dynamic compilation
  • No need to cache assemblies to disk, leading to a much simpler and lighter weight system.
  • New shiny thing! :)

More detail about the code

The code for my sample view engine is on Github (https://github.com/davidebbo/RoslynRazorViewEngine), so I’ll mostly let you check it out there. All the interesting code is in RoslynRazorViewEngine.cs.

Here are the main steps that it goes through to turn a Razor file into an Assembly:

  • First it uses the Razor Engine to generate a CodeCompileUnit from the Razor file.
  • It then uses CodeDom to turn the CodeCompileUnit into C# source code. Note that we only use CodeDom as a code generator here, and not to actually compile anything.
  • We then use Roslyn to compile the course code into a byte[]. That byte array is basically an in memory copy of what would normally be a .dll file.
  • Finally, we call Assembly.Load to load that byte[] into a runtime Assembly.

How restrictive are the limitations in the Roslyn CTP?

As I mentioned above, there are lots of limitations, which make this little more than a proof of concept.

To begin with, it doesn’t support dynamic, which MVC uses pretty heavily. By default, MVC views extend WebViewPage, so I had to add '@model object' at the top of my test view to get around that.

Then there is ViewBag, which is also dynamic, and allows writing things like ‘@ViewBag.Message’. I tried replacing that by ‘@ViewData[“Message”]’, only to find out that indexers were not supported either. Duh!

And then it doesn’t support anonymous objects, which MVC uses quite a bit…

So don’t even think of trying to use this for anything real at this time. Still, the approach feels pretty sound, and whenever Roslyn becomes more feature complete, I have good hope that it can help us improve the ASP.NET compilation system.

comments edit

Note (12/22/2011): in NuGet 1.6 or later, this feature is built in, so you no longer need to use the NuGetPowerTools. Just right click on the Solution and choose ‘Enable NuGet Package Restore’.

A few months ago, I described a workflow that lets you use NuGet without committing the packages to source control. This has been a very popular workflow, and generally works quite well.

The down side is that it’s a bit painful to set up: you have to get NuGet.exe and add it to your tree, then you have to add a pre-build event for every project that uses NuGet.

The good news is that the ever-resourceful David Fowler has come up with a much easier way to set that up, using his NuGetPowerTools package. Here is the way to do it:

Let’s assume that you have a solution that is either already using NuGet, or planning to use it, and that you want to set up the no-commit workflow.

Now, you just need to go to the Package Manager Console and run a couple commands:

PM> Install-Package NuGetPowerTools
Successfully installed 'NuGetPowerTools 0.28'.

**********************************************************************************
INSTRUCTIONS
**********************************************************************************
- To enable building a package from a project use the Enable-PackageBuild command
- To enable restoring packages on build use the Enable-PackageRestore command.
- When using one of the above commands, a .nuget folder will been added to your
solution root. Make sure you check it in!
- For for information, see https://github.com/davidfowl/NuGetPowerTools
**********************************************************************************


PM> Enable-PackageRestore
Attempting to resolve dependency 'NuGet.CommandLine (≥ 1.4)'.
Successfully installed 'NuGet.CommandLine 1.4.20615.182'.
Successfully installed 'NuGet.Build 0.16'.

Copying nuget.exe and msbuild scripts to D:\Code\StarterApps\Mvc3Application\.nuget
Successfully uninstalled 'NuGet.Build 0.16'.
Successfully uninstalled 'NuGet.CommandLine 1.4.20615.182'.

Don't forget to commit the .nuget folder
Updated 'Mvc3Application' to use 'NuGet.targets'
Enabled package restore for Mvc3Application

And you’re done! So basically, the first command installs a NuGet package which brings in some helpful commands, and the second one runs one of those commands.

After doing this, you’ll notice a new .nuget folder under your solution, containing nuget.exe plus a couple msbuild target files. Make sure you commit that folder to source control! You’ll also find a few changes in your csproj files to trigger the restore functionality when you build.

I have now become a strong supporter of the don’t commit packages workflow, and if you’re going to use it, this is the way to do it!